Sunday, December 25, 2011

Merry Christmas!


MERRY CHRISTMAS!
Here's just a few holiday cards to share with you this Christmas Day. I hope that everyone enjoys their day surrounded by family and friends! Cheers and Happy New Year!

Let It Snow! 

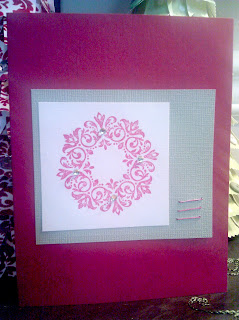
Christmas Wreath with Rhinestones and Staple Embellishments

Traditional Merry Christmas


Snowflake Punch


Merry and Joy


Seattle Christmas
Every year I buy new Christmas stamps and supplies. This stamp, bought almost 10 years ago, continues to be my favorite!


Photobucket

Monday, October 31, 2011

(it's been awhile, but I'm back into craft mode!......)

Trick or Treat!


These cupcake toppers are easy to make and are adorable! I started by googling image search  "halloween cupcake toppers" and came across this free printable. I added my own touch by using a circle punch to just cut the image, and a scalloped circle punch for the accent color. I used hot glue in between two scallop punches to insert the toothpick.  3D dots were used to adhere the image and to add some depth to the final product. 

The cupcakes I made were pumpkin spice, with vanilla pumpkin spice frosting! Yummmmmm.....


Photobucket

Tuesday, June 14, 2011

DIY Home Decor Balls & Box

This is a quick and easy decorating tip. DIY home decor balls are simple to make and only require a few supplies.... hot glue, any kind of rope, yarn, or string (preferably thicker), and a sphere of some sort (styrofoam ball, wiffle ball, etc...).

First step is to start at any point with a dab of hot glue and circle the string around the center point, gluing as you are winding the string around and continue until the whole ball is covered. 

Ta da! Simple and cute!

After seeing all these decor ball tutorials on line, I thought why not decorate a box? Any size box can be used applying the same method as the balls, outcome: you get a cool piece of DIY art. I used twine on the box, it was a little time consuming but it was totally worth the finished product! 

I placed my new decor on top of my entertainment center and paired it next to a bottle of Chianti saved from my birthday last year. 


I am trying to get back into the groove of crafting, but I promise... more projects coming soon! 


Photobucket

Tuesday, May 24, 2011

It's May ALREADY? Updates!

I can't believe it's already the end of May! Where has twenty eleven gone?! It's been months MONTHS since my last update, and even longer since I actually posted something to do with crafting! Thought I'd fill you in on what I have been doing and how my trip to India was...
As I mentioned in my last post I am an opening team trainer for California Pizza Kitchen. In January I was in Boston, and then late February I got the chance to do an international opening in Mumbai, India! It was an amazing experience and I am very grateful that I was given the opportunity to experience such an amazing country!

On our morning walk, or anytime of the day actually, wild cows would be roaming the streets of the city. 

This is the biggest tourist attraction in Mumbai. The Taj Hotel and the Gateway of India. Behind the Taj Hotel the streets are lined with tons of street vendors and markets, lots of shopping! 

One of the last days I was there, I got a traditional mehndi (henna) on my left arm. It is typically done for holidays, celebrations, and for weddings. Before the wedding the bride gets both of her hands and arms (up to the elbow) and both feet and legs (up to the knee) done. The groom also get some done to match.

I was the bartender trainer at this opening. This picture is of my bartender trainees and I after a day of training and making some delicious drinks! I had an awesome time training them, and they taught me so much about their culture and city! 

Here it is! The second location in Mumbai, India! After working VERY long days, trying to function off of very little sleep, and adapting to the culture shock.... opening day opened as scheduled and was a success! 

I h.e.a.r.t. Seattle! 
(The Space Needle is barely visible on the top right side.)
I was SOOO happy to touch ground in Seattle after being gone for a month (again!) and enduring a 16 hour flight from India to Newark, a 5 hour layover and then a lovely 5 hour flight from Newark to Seattle! The first thing I did was drive straight to McDonalds and get a juicy cheeseburger, I had MAJOR withdrawals! 


Now that I've actually paid a little attention to my blog and have updated it... Now it's time to CRAFT! I have a lot of projects in the works and even more brewing up my mind! 

Stay tuned.....

Thursday, February 10, 2011

Update On Where I've Been

This past month I spent living in Boston, MA. I had the opportunity to travel for work as an Opening Team Trainer for California Pizza Kitchen. I truly missed my blog and working anywhere from 12 to 20 hours a day, there was no time left for crafting! I am home for only two weeks and hope to complete a couple of projects. I am leaving again for another store opening in Mumbai, India!


I'd love to share a couple of things from my trip!

This was taken from the top of The Prudential Center, Fenway Park is in the top right corner. 

The Front Of The House training team. 


The night before a huge snow storm was going to hit...

The morning after. It snows WAY too much there! 


Couple of new slang words that I learned about also....

Instead of calling them small bottles, or airplane shots.... they call them "nips"?!

..."wicked" is used more than it probably should be.

They also call a water fountain a "bubbler". 
The liquor store is considered to be "The Package Store" because they put your liquor into a brown package bag, they also call it "The Packie". 


Can't wait to share with you what I learn in INDIA! 

Photobucket

Tuesday, December 21, 2010

Holiday Cards

Here are a few holiday cards that I made.

One stamp was used to create three different designs...

Items used:
Green card stock, yellow card stock, red staples, rhinestones, HAPPY HOLIDAYS stamp, and 3D dots.


THIS ONE IS MY FAVORITE! I HEART SEATTLE!
Items used:
Black embossing powder, green glitter glue, red dot embellishments, and HAPPY HOLIDAYS stamp.


Items used:
Blue card stock, circle punch, snowflake punch, snowflake stamp,blue rhinestones, 3D dots, and HAPPY HOLIDAYS stamp

Happy Holidays & Merry Christmas! :)


Photobucket

Tuesday, December 14, 2010

Oh Christmas Tree(s)!

Wow! Christmas tree cones are EVERYWHERE! I have seen so many different styles this year of these trees... using twine, gumdrops, ribbon, feathers, pearls, flowers, buttons, etc. 
Mine are simple and a bit less complicated... I just used speciality paper (and by special I mean expensive!) You can't really see it in the pictures but the print of the paper is textured. I used three different sized styrofoam cones and cut strips of paper 1 inch wide by 1 1/2 inch in length, used "pinking"scissors at the end of each strip and used hot glue to adhere the strips starting from the base up. 
*(to get the paper to flip I slightly curled them using a pen.)


Embellishments were simple... flowers, buttons, and rhinestones. I used flower wire to attach the embellishment at the top of each tree. This picture shows a better detailed view of why I used the pinking scissors. 

The large tree used two pieces of 12x12 paper, and the two smaller trees used one 12x12 each


Photobucket